# Tutorial 2: Using OAuth2
{% hint style="info" %}
Note: Make sure that you have completed Tutorial 1 and familiarised yourself with the Person JSON schema, and that you have understood the OAuth Process first.
{% endhint %}
For this tutorial, you will need to call the APIs from your server-based (or running from localhost) application.
Myinfo uses [OAuth2.0](https://oauth.net/2/) for our Authentication and Authorisation flow.
Please refer to our [API specifications](https://public.cloud.myinfo.gov.sg/myinfo/api/myinfo-kyc-v3.2.html) for this tutorial.
***
## 1. Download our Sample Client Application
For the purposes of the tutorial, please download our sample client application from [Github.](https://github.com/singpass/myinfo-demo-app)
### **1.1 Install Node.js and NPM**
In order for the demo application to run, you will need to Install Node.js and NPM. Follow the instructions given by the links below depending on your OS.
* [Install Node.js and NPM for Windows](http://blog.teamtreehouse.com/install-node-js-npm-windows)
* [Install Node.js and NPM for Linux](http://blog.teamtreehouse.com/install-node-js-npm-linux)
* [Install Node.js and NPM for Mac](http://blog.teamtreehouse.com/install-node-js-npm-mac)
### **1.2 Run NPM install**
Run the following command in the folder you unzipped the application:
```
npm install
```
### **1.3 Start the Application**
**For Linux/MacOS**
Execute the following command to start the application:
```
./start.sh
```
**For Windows**\
\
Execute the following command to start the application:
```
.\start.bat
```
**Access the Application on Your Browser**\
\
You should be able to access the sample application via the following URL:
```
http://localhost:3001
```
***
## 2. Trigger MockPass Login and Consent (authorise API)
The authorise endpoint triggers the MockPass login and shows the consent page after successful login.\
Click on the "Retrieve Myinfo" button on the sample application.\
\
This calls the URL below (with some additional parameters):
```
http://sandbox.api.myinfo.gov.sg/com/v3/authorise
```
This calls the URL below (with some additional parameters):
| PARAMETER | DESCRIPTION |
| ------------- | ------------------------------------------------------------------------------------------------------------------------------------------------------------- |
| client\_id | unique ID for your application. For our sample application, this is `STG2-MYINFO-SELF-TEST` |
| attributes | comma separated list of attributes requested. Possible attributes are listed in the Person object definition in the API specifications. |
| purpose | state the purpose of requesting the data. This will be shown to the Person when requesting for his consent |
| state | identifier to reconcile query and response. This will be sent back to you via the callback URL. Use a unique system generated number for each and every call. |
| redirect\_uri | your callback URL for Myinfo to return with the authorisation code. For our sample application this is `http://localhost:3001/callback` |
Look at the file `views/html/index.html` in the sample application and look for the following lines of code:
The `index.html` file is the frontend (client side) code.
```
function callAuthoriseApi() {
var authoriseUrl = authApiUrl + "?client_id=" + clientId +
"&attributes=" + attributes +
"&purpose=" + purpose +
"&state=" + state +
"&redirect_uri=" + redirectUrl;
window.location = authoriseUrl;
}
```
This code triggers the authorise API.
### **2.1 Login with MockPass**
Select this test ID and login using MockPass:
NRIC: `S9812381D`
You may also use test personas found in the Personas Page when testing Tutorial 2.
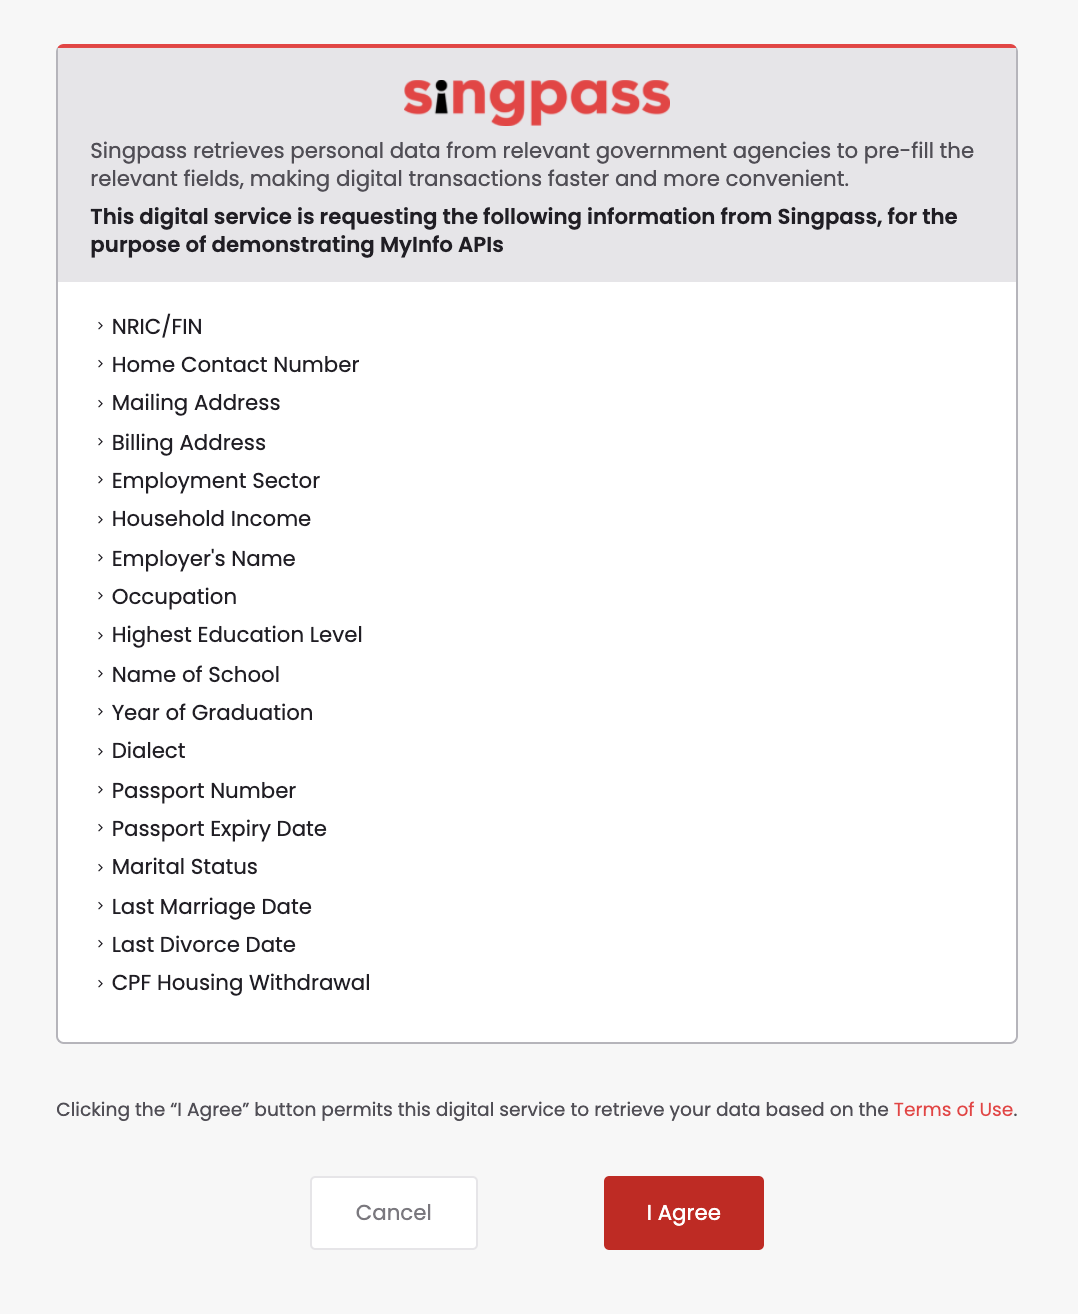
### **2.2 Consent Page**
Once you have successfully logged into MockPass, a consent page similar to the one below will be shown:
### **2.3 Get the Authorisation Code**
If you have followed the steps above correctly, the Consent Platform should return you an authorisation code by invoking your callback URL. You should now see something like this in your browser URL dialog:
```
http://localhost:3001/callback?code=e2369168-52da-421a-b70f-03f64e779c4b&state=123
```
Notice the parameter `code` is the authorisation code that your application will need to invoke the next API (token). In the example above, the authorisation code is `e2369168-52da-421a-b70f-03f64e779c4b`. We will use this authorisation code in the next token API call.
The **token** and **person** API calls will follow automatically once you have finished the consent page.
We will look at the code for these 2 APIs in the following sections.
## 3. Call the Token API (with the authorisation code)
Now that you have the authorisation code, you can invoke the token API to get the access token.
{% hint style="info" %}
Note: This API must be called from a server-side component. It cannot be called from the browser or mobile native client application due to security reasons (there is no secure place to store your private key).
{% endhint %}
Look at the code in the file `routes/index.js` in our sample client application and search for the following:
`index.js` is the backend (server side) code.
```
// function to prepare request for TOKEN API
function createTokenRequest(code) {
var cacheCtl = "no-cache";
var contentType = "application/x-www-form-urlencoded";
var method = "POST";
var request = null;
// preparing the request with header and parameters
// assemble params for Token API
var strParams = "grant_type=authorization_code" +
"&code=" + code +
"&redirect_uri=" + _redirectUrl +
"&client_id=" + _clientId +
"&client_secret=" + _clientSecret;
var params = querystring.parse(strParams);
// assemble headers for Token API
var strHeaders = "Content-Type=" + contentType + "&Cache-Control=" + cacheCtl;
var headers = querystring.parse(strHeaders);
// Sign request and add Authorization Headers
var authHeaders = generateAuthorizationHeader(
_tokenApiUrl,
params,
method,
contentType,
_authLevel,
_clientId,
_privateKeyContent,
_clientSecret
);
if (!_.isEmpty(authHeaders)) {
_.set(headers, "Authorization", authHeaders);
}
var request = restClient.post(_tokenApiUrl);
// Set headers
if (!_.isUndefined(headers) && !_.isEmpty(headers))
request.set(headers);
// Set Params
if (!_.isUndefined(params) && !_.isEmpty(params))
request.send(params);
return request;
}
```
The code is creating the request to call the following API:
```
https://sandbox.api.myinfo.gov.sg/com/v3/token
```
{% hint style="info" %}
Note: This API is using HTTPS POST.
{% endhint %}
The parameters in the POST body are as follows:
| PARAMETER | DESCRIPTION |
| -------------- | -------------------------------------------------------------------------------------------------------------------------------------- |
| grant\_type | grant type for getting token (default "authorization\_code") |
| code | the authcode given by the authorise API. |
| redirect\_uri | your callback URL for Myinfo to validate. For our sample application this is `http://localhost:3001/callback` |
| client\_id | unique ID for your application. For our sample application, this is `STG2-MYINFO-SELF-TEST` |
| client\_secret | secret key given to your application during onboarding. For our sample application, this is `44d953c796cccebcec9bdc826852857ab412fbe2` |
The sample application will then send the constructed request to the API Gateway, and you should see the following response from the onscreen logs:
```
Response from Token API:{"access_token":"eyJ0eXAiOiJKV1QiLCJ6aXAiOiJOT05FIiwia2lkIj
oiRWtnWkZDeG5taXY2T2JDZ3B4blRIRUkyK3FVPSIsImFsZyI6IlJTMjU2I
n0.eyJzdWIiOiJTOTgxMjM4MUQiLCJjdHMiOiJPQVVUSDJfU1RBVEVMRVNT
X0d
SQU5UIiwiYXV0aF9sZXZlbCI6MCwiYXVkaXRUcmFja2luZ0lkIjoiYzNjOT
U1MjUtNzEwYS00ZjU3LWFhZTMtMzEzMjUwZDkxOWE3LTEzOTc3NiIsImlzc
yI6Imh0dHBzOi8vY29uc2VudC5jbG91ZC5teWluZm8uZ292LnNnL2NvbnNl
bnQvb2F1dGgyL3JlYWxtcy9yb290L3JlYWxtcy9teWluZm8tY29tIiwidG9
rZW5OYW1lIjoiYWNjZXNzX3Rva2VuIiwidG9rZW5fdHlwZSI6IkJlYXJlci
IsImF1dGhHcmFudElkIjoiZDVzZ3RWZHl1UFNOc0haTHJkYVUyMTAwTV9zI
iwiYXVkIjoibXlpbmZvIiwibmJmIjoxNTUzNTk0OTc4LCJncmFudF90eXBl
IjoiYXV0aG9yaXphdGlvbl9jb2RlIiwic2NvcGUiOlsiZWR1bGV2ZWwiLCJ
tb2JpbGVubyIsImFzc2Vzc2FibGVpbmNvbWUiLCJvd25lcnByaXZhdGUiLC
JuYXRpb25hbGl0eSIsImRvYiIsImNwZmNvbnRyaWJ1dGlvbnMiLCJlbWFpb
CIsInNleCIsImhvdXNpbmd0eXBlIiwiY3BmYmFsYW5jZXMiLCJuYW1lIiwi
cmVnYWRkIiwicmFjZSIsImhkYnR5cGUiLCJtYXJpdGFsIiwiYXNzZXNzeWV
hciJdLCJhdXRoX3RpbWUiOjE1NTM1OTQ3NzIsInJlYWxtIjoiL215aW5mby
1jb20iLCJleHAiOjE1NTM1OTY3NzgsImlhdCI6MTU1MzU5NDk3OCwiZXhwa
XJlc19pbiI6MTgwMCwianRpIjoieGRIN1QwSjI0TmFHS1FpWWVnNjcyREJf
ZGdrIn0.jbdjui3WLe-cwPRDCCR09ya5fK4UUntx31Y87PosGV_FTnKTmiy
_cYOeaVT
pjLmPx4ebo0fLooPHpKH_5_4lFPVaNdQkOGjvScV1fl04DR1UW0uutQubkI
alYW-WgmIDhQz4ZddXyLswUnGc7-eURR47VDzjiMr-ptcn0uSfrI1RNgnc8
kY12slOAE4bGxxmYE_PlBLQuZiCdORD9JKKjEKAptKVyQF7p9o6EAg2TQe4
cpwcDLXYUkwjLcaoEdCXmX16QICFm9RsVFaW_PRl29fY9ErxcN27UrRnj4m
qfbYUuRnN-W2e6DSnMfkZwMRKOlmPgD7fflfh5dnuNwGAXQ",
"scope":"edulevel mobileno assessableincome ownerprivate
nationality dob cpfcontributions email sex housingtype
cpfbalances name regadd race hdbtype marital assessyear",
"token_type":"Bearer","expires_in":1799}
```
Notice the response contains an "access\_token", which is in the JWT\_ \_ (JSON Web Token) format.
### **3.1 What is the JSON Web Token structure?**
JSON Web Tokens consist of three parts separated by dots (.), which are:
* Header
* Payload
* Signature
Therefore, a JWT typically looks like the following: `xxxxx.yyyyy.zzzzz`
The header and the payload are Base64Url encoded. The signature is created using these two, a secret and the hashing algorithm being used (as specified in the header: HMAC, SHA256 or RSA).
### **3.2 How can I parse the JWT?**
In order to parse the JWT you can use one of the libraries listed in the Libraries for Token Signing/Verification section of `JWT.io.`\_ \_
For example, in our sample application, which is implemented with Node.js, we use the `node-jsonwebtoken` library, and we call the `jwt.verify()` method. If the parsing fails then the library will return a JsonWebTokenError error with the message jwt malformed.
{% hint style="info" %}
Note: Many web frameworks (such as ASP.NET Core for example) have JWT middleware that handle the token validation. Most of the times this will be a better route to take, rather that resorting to use a third-party library, as the middleware typically integrates well with the framework's overall authentication mechanisms.
{% endhint %}
Look at the code in the file `lib/security/security.js` and search for the following code snippet:
```
// Verify & Decode JWS or JWT
security.verifyJWS = function verifyJWS(jws, publicCert) {
// verify token
// ignore notbefore check because it gives errors sometimes if the call is too fast.
var decoded = jwt.verify(jws, publicCert, { algorithms: ['RS256'], ignoreNotBefore: true });
return decoded;
}
```
This calls the library to parse the JWT and return the decoded JSON object, which is the **access token.**
You should see the decoded access token in the onscreen logs that looks like this:
```
Decoded Access Token:
{"sub":"9E9B2260-47B8-455B-89B5-C48F4DB98322","cts":"OAUTH2_STATELESS_GRANT","auth_level":0,"auditTrackingId":"c3c95525-710a-4f57-aae3-C48F4DB98322","iss":"https://consent.cloud.myinfo.gov.sg/consent/oauth2/realms/root/realms/myinfo-com","tokenName":"access_token","token_type":"Bearer","authGrantId":"d5sgtVdyuPSNsHZLrdaU2100M_s","aud":"myinfo","nbf":1553594978,"grant_type":"authorization_code","scope":["edulevel","mobileno","assessableincome","ownerprivate","nationality","dob","cpfcontributions","email","sex","housingtype","cpfbalances","name","regadd","race","hdbtype","marital","assessyear"],"auth_time":1553594772,"realm":"/myinfo-com","exp":1553596778,"iat":1553594978,"expires_in":1800,"jti":"xdH7T0J24NaGKQiYeg672DB_dgk"}
```
This access token is a representation of the permissions that was given by the user when he/she clicked on "I Agree" on the consent page.
Note:It is very important for your application to validate the signature of the JWT to ensure the response has not been changed in transit.
Notice the `sub` attribute in the JSON token. That is the **identifier** of the person who logged in via MockPass. We will use this identifier for the Person API call next.
***
## 4. Call the Person API (with the access token)
Now that you have the access token, you can invoke the person API to get the Person data.
Note:This API must be called from a server-side component. It cannot be called from the browser or mobile native client application due to security reasons (there is no secure place to store your private key).
This API call is essentially the same as the one you tried in Tutorial 1, except that here you will need to provide a valid access token or your API call will be rejected.
Look at the code in the file `routes/index.js` in our sample client application and search for the following:
`index.js` is the backend (server side) code.
```
// function to prepare request for PERSON API
function createPersonRequest(sub, validToken) {
var url = _personApiUrl + "/" + sub + "/";
var cacheCtl = "no-cache";
var method = "GET";
var request = null;
// assemble params for Person API
var strParams = "client_id=" + _clientId +
"&attributes=" + _attributes;
var params = querystring.parse(strParams);
// assemble headers for Person API
var strHeaders = "Cache-Control=" + cacheCtl;
var headers = querystring.parse(strHeaders);
var authHeaders;
// Sign request and add Authorization Headers
authHeaders = generateAuthorizationHeader(
url,
params,
method,
"", // no content type needed for GET
_authLevel,
_clientId,
_privateKeyContent,
_clientSecret
);
if (!_.isEmpty(authHeaders)) {
_.set(headers, "Authorization", authHeaders + ",Bearer " + validToken);
}
else {
// NOTE: include access token in Authorization header as "Bearer " (with space behind)
_.set(headers, "Authorization", "Bearer " + validToken);
}
// invoke token API
var request = restClient.get(url);
// Set headers
if (!_.isUndefined(headers) && !_.isEmpty(headers))
request.set(headers);
// Set Params
if (!_.isUndefined(params) && !_.isEmpty(params))
request.query(params);
return request;
}
```
The code is creating the request to call the following API:
```
https://sandbox.api.myinfo.gov.sg/com/v3/person/9E9B2260-47B8-455B-89B5-C48F4DB98322/?client_id=STG2-MYINFO-SELF-TEST&attributes=name%2Csex%2Crace%2Cnationality%2Cdob%2Cemail%2Cmobileno%2Cregadd%2Chousingtype%2Chdbtype%2Cmarital%2Cedulevel%2Cassessableincome%2Chanyupinyinname%2Caliasname%2Chanyupinyinaliasname%2Cmarriedname%2Ccpfcontributions%2Ccpfbalances
```
**Note that this API is called using HTTPS `GET`.**
The additional query parameters are as follows:
| PARAMETER | DESCRIPTION |
| ---------- | --------------------------------------------------------------------------------------------------------------------------------------- |
| client\_id | unique ID for your application. For our sample application, this is `STG2-MYINFO-SELF-TEST` |
| attributes | comma separated list of attributes requested. Possible attributes are listed in the Person object definition in the API specifications. |
### **4.1 Providing the Access Token in the Request Header**
The access token should be provided in the *header* of your API call under "Bearer".
You should see something like this in the onscreen logs:
```
headers:{"Cache-Control":"no-cache","Authorization":"Bearer eyJ0eXAiOiJKV1QiLCJ6aXAiOiJOT05FIiwia2lkIjoiRWtnWkZDeG5taXY2T2JDZ3B4blRIRUkyK3FVPSIsImFsZyI6IlJTMjU2In0.eyJzdWIiOiJTOTgxMjM4MUQiLCJjdHMiOiJPQVVUSDJfU1RBVEVMRVNTX0dSQU5UIiwiYXV0aF9sZXZlbCI6MCwiYXVkaXRUcmFja2luZ0lkIjoiYzNjOTU1MjUtNzEwYS00ZjU3LWFhZTMtMzEzMjUwZDkxOWE3LTEzOTc3NiIsImlzcyI6Imh0dHBzOi8vY29uc2VudC5jbG91ZC5teWluZm8uZ292LnNnL2NvbnNlbnQvb2F1dGgyL3JlYWxtcy9yb290L3JlYWxtcy9teWluZm8tY29tIiwidG9rZW5OYW1lIjoiYWNjZXNzX3Rva2VuIiwidG9rZW5fdHlwZSI6IkJlYXJlciIsImF1dGhHcmFudElkIjoiZDVzZ3RWZHl1UFNOc0haTHJkYVUyMTAwTV9zIiwiYXVkIjoibXlpbmZvIiwibmJmIjoxNTUzNTk0OTc4LCJncmFudF90eXBlIjoiYXV0aG9yaXphdGlvbl9jb2RlIiwic2NvcGUiOlsiZWR1bGV2ZWwiLCJtb2JpbGVubyIsImFzc2Vzc2FibGVpbmNvbWUiLCJvd25lcnByaXZhdGUiLCJuYXRpb25hbGl0eSIsImRvYiIsImNwZmNvbnRyaWJ1dGlvbnMiLCJlbWFpbCIsInNleCIsImhvdXNpbmd0eXBlIiwiY3BmYmFsYW5jZXMiLCJuYW1lIiwicmVnYWRkIiwicmFjZSIsImhkYnR5cGUiLCJtYXJpdGFsIiwiYXNzZXNzeWVhciJdLCJhdXRoX3RpbWUiOjE1NTM1OTQ3NzIsInJlYWxtIjoiL215aW5mby1jb20iLCJleHAiOjE1NTM1OTY3NzgsImlhdCI6MTU1MzU5NDk3OCwiZXhwaXJlc19pbiI6MTgwMCwianRpIjoieGRIN1QwSjI0TmFHS1FpWWVnNjcyREJfZGdrIn0.jbdjui3WLe-cwPRDCCR09ya5fK4UUntx31Y87PosGV_FTnKTmiy_cYOeaVTpjLmPx4ebo0fLooPHpKH_5_4lFPVaNdQkOGjvScV1fl04DR1UW0uutQubkIalYW-WgmIDhQz4ZddXyLswUnGc7-eURR47VDzjiMr-ptcn0uSfrI1RNgnc8kY12slOAE4bGxxmYE_PlBLQuZiCdORD9JKKjEKAptKVyQF7p9o6EAg2TQe4cpwcDLXYUkwjLcaoEdCXmX16QICFm9RsVFaW_PRl29fY9ErxcN27UrRnj4mqfbYUuRnN-W2e6DSnMfkZwMRKOlmPgD7fflfh5dnuNwGAXQ"}
```
Once this is done, you should see the person JSON in the onscreen logs that looks like this:
```
Person Data (Decoded):
{"name":{"lastupdated":"2019-03-26","source":"1","classification":"C","value":"TAN XIAO HUI"},"sex":{"lastupdated":"2019-03-26","code":"F","source":"1","classification":"C","desc":"FEMALE"},"race":{"lastupdated":"2019-03-26","code":"CN","source":"1","classification":"C","desc":"CHINESE"},"nationality":{"lastupdated":"2019-03-26","code":"SG","source":"1","classification":"C","desc":"SINGAPORE CITIZEN"},"dob":{"lastupdated":"2019-03-26","source":"1","classification":"C","value":"1998-06-06"},"email":{"lastupdated":"2019-03-26","source":"2","classification":"C","value":"myinfotesting@gmail.com"},"mobileno":{"lastupdated":"2019-03-26","source":"2","classification":"C","areacode":{"value":"65"},"prefix":{"value":"+"},"nbr":{"value":"97399245"}},"regadd":{"country":{"code":"SG","desc":"SINGAPORE"},"unit":{"value":"128"},"street":{"value":"BEDOK NORTH AVENUE 4"},"lastupdated":"2019-03-26","block":{"value":"102"},"source":"1","postal":{"value":"460102"},"classification":"C","floor":{"value":"09"},"type":"SG","building":{"value":"PEARL GARDEN"}},"housingtype":{"lastupdated":"2019-03-26","code":"","source":"1","classification":"C","desc":""},"hdbtype":{"lastupdated":"2019-03-26","code":"113","source":"1","classification":"C","desc":"3-ROOM FLAT (HDB)"},"marital":{"lastupdated":"2019-03-26","code":"2","source":"1","classification":"C","desc":"MARRIED"},"edulevel":{"lastupdated":"2019-03-26","code":"3","source":"2","classification":"C","desc":"SECONDARY"},"ownerprivate":{"lastupdated":"2019-03-26","source":"1","classification":"C","value":false},"cpfcontributions":{"lastupdated":"2019-03-26","source":"1","history":[{"date":{"value":"2018-02-18"},"employer":{"value":"Crystal Horse Invest Pte Ltd"},"amount":{"value":500},"month":{"value":"2018-01"}},{"date":{"value":"2018-03-18"},"employer":{"value":"Crystal Horse Invest Pte Ltd"},"amount":{"value":500},"month":{"value":"2018-02"}},{"date":{"value":"2018-04-18"},"employer":{"value":"Crystal Horse Invest Pte Ltd"},"amount":{"value":500},"month":{"value":"2018-03"}},{"date":{"value":"2018-05-18"},"employer":{"value":"Crystal Horse Invest Pte Ltd"},"amount":{"value":500},"month":{"value":"2018-04"}},{"date":{"value":"2018-05-27"},"employer":{"value":"Crystal Horse Invest Pte Ltd"},"amount":{"value":500},"month":{"value":"2018-05"}},{"date":{"value":"2018-07-15"},"employer":{"value":"Crystal Horse Invest Pte Ltd"},"amount":{"value":500},"month":{"value":"2017-01"}},{"date":{"value":"2017-02-01"},"employer":{"value":"Crystal Horse Invest Pte Ltd"},"amount":{"value":500},"month":{"value":"2017-01"}},{"date":{"value":"2017-02-12"},"employer":{"value":"Crystal Horse Invest Pte Ltd"},"amount":{"value":500},"month":{"value":"2017-02"}},{"date":{"value":"2017-02-21"},"employer":{"value":"Crystal Horse Invest Pte Ltd"},"amount":{"value":500},"month":{"value":"2017-02"}},{"date":{"value":"2017-03-01"},"employer":{"value":"Crystal Horse Invest Pte Ltd"},"amount":{"value":500},"month":{"value":"2017-02"}},{"date":{"value":"2017-03-12"},"employer":{"value":"Crystal Horse Invest Pte Ltd"},"amount":{"value":500},"month":{"value":"2017-03"}},{"date":{"value":"2017-03-21"},"employer":{"value":"Crystal Horse Invest Pte Ltd"},"amount":{"value":500},"month":{"value":"2017-03"}},{"date":{"value":"2017-04-01"},"employer":{"value":"Crystal Horse Invest Pte Ltd"},"amount":{"value":500},"month":{"value":"2017-03"}},{"date":{"value":"2017-04-12"},"employer":{"value":"Crystal Horse Invest Pte Ltd"},"amount":{"value":500},"month":{"value":"2017-04"}},{"date":{"value":"2017-04-21"},"employer":{"value":"Crystal Horse Invest Pte Ltd"},"amount":{"value":500},"month":{"value":"2017-04"}}],"classification":"C"},"cpfbalances":{"oa":{"value":1581.48},"ma":{"value":11470.7},"lastupdated":"2019-03-26","source":"1","classification":"C","sa":{"value":21967.09},"ra":{"value":0}},"uinfin": {"lastupdated": "2019-03-26","source": "1","classification": "C","value": "S9812381D"
}}
```
***
## 5. Use the JSON object to Prefill Form
If you have followed the steps above correctly, you should have gotten the Person JSON object. Now you can use this JSON object to prefill the form values in your application.
Look at the code in our sample client application and you will see it is using the response JSON to prefill the values on the application form. Once this is done, the user just needs to submit the form and your application can save the values into your database for subsequent processing.
***
## Summary
You've successfully used the OAuth2 process to get the Person data from Myinfo sandbox environment.
---
# Agent Instructions: Querying This Documentation
If you need additional information that is not directly available in this page, you can query the documentation dynamically by asking a question.
Perform an HTTP GET request on the current page URL with the `ask` query parameter:
```
GET https://docs.developer.singpass.gov.sg/docs/legacy-myinfo-v3-v4/technical-specifications/myinfo-v3/tutorials/tutorial-2-using-oauth2.md?ask=
```
The question should be specific, self-contained, and written in natural language.
The response will contain a direct answer to the question and relevant excerpts and sources from the documentation.
Use this mechanism when the answer is not explicitly present in the current page, you need clarification or additional context, or you want to retrieve related documentation sections.